
by Pam Tremble | Apr 13, 2010 | Art & Creativity

Let's Doodle!
A few weeks ago I taught the Doodling class I mentioned a while ago. It was a huge success and everyone lived the experience! Because I had such a small budget for my class materials, I had to get creative. My students needed a good doodling pen plus instructions plus templates plus something to actually doodle on. If my budget would have allowed, I would have loved providing each student with a nice hard-bound blank journal and a very nice pen. But alas, I had $3 per students and the pens I picked cost $2. So making a handmade doodle book was my only economical options. But look how cute they are!

I made a total of 35 books. When doing that many projects, assembly line fashion is the easiest method. Here is a list of supplies needed:
1 sheet 12×12 heavy scrapbook paper/cardstock with designs on both sides
6 sheets 9×12 Canson Drawing Paper – I used Canson because it’s thick (70lbs) to limit ink bleed and also it’s cheap
2 large brads / paper fasteners
3 yards craft string
scrap paper as needed
Trim your scrapbook paper to 9.25″ x 12″ and fold in half (save the leftover scraps for later). Fold your 6 sheets of drawing paper in half, making sure the spine is creased well. Using a heavy duty paper trimmer, cut the jagged edge of the folded drawing paper that’s created in the folding process – this gives you an even outer edge.

Once your inside pages and outside covers are all prepared, stack them together, being careful to line up the fold lines of each. Secure the inside pages into position with paper clips. Once you have all your books pre-assembled, you’re ready to punch holes. I knew I wanted 5 holes along my spine for sewing, so I created a simple template with a center hole and 2 holes on either side spaced equally to the end. Lightly mark the hole marks on the inside spine and punch!
I found this monster gadget on clearance at Walmart for $10 – what a steal! You can find the Crop-O-Dile Big Bite at most craft stores or on Amazon. This thing is amazing. Really! I was able to punch THREE of these doodle books at once — that’s 21 sheets of 70lb paper, folks!

Ok, holes are all punched! Time to sew!
I used “Braiding Cord” — similar to this. My goal was to find some type of string or cording that was the same material as the string on an interoffice envelope clasp. This comes very close. Found it at Walmart in the kids craft section near the beads. It comes in every color of the rainbow, it’s very sturdy and doesn’t fray at the ends.

I then added small fasteners to create a closure / clasp at the edge of the book – just to keep it neatly closed. Simply tie another piece of string to the back fastener permanently then wrap the other end of the string around the front clasp for closing. On the inside cover of the doodle books, the back of the fastener is exposed, but you can conceal the hardware by using a piece of coordinating scrap paper. I used the scrap piece of cardstock from the cover and used in on the inside cover flap to cover the fastener along with a second smaller piece of cardstock to give an additional decorative element. Not only do these extra pieces hide the hardware of the clasp, but it also does an excellent job of giving added support to the cover, making it more rigid and sturdy for daily use.

Have fun making your own Doodle Book!

by Pam Tremble | Mar 15, 2010 | Art & Creativity
This semester at school as officially kicked my butt! I took both Photoshop and Illustrator in the same term — talk about confusing. Just when I think I know what I’m doing I find out I’m wrong. I keep looking for tools in Photoshop that are only in Illustrator – and vice versa. Ahhh well, that’s all part of learning right?
So I’m heading into Finals Week and still have another few hours of homework to tackle before I can go to bed tonight. But figured I’d share my final Illustrator project here in the meantime. It’s a magazine cover design for the school creative magazine that’s published once a year and includes poetry, illustrations and creative writing from students. Obviously the title is “Expressions.” The cover and divider pages are designed by students as well. Not that I expect to win or anything – but the professor had us create a cover for entry as our final project.
It took me WAY too long. And this is actually the 4th rendition. The first 3 just didn’t do it for me. This one isn’t fabulous and there are things I’d definitely change (lots of things) — but I had to call it done and move on. Truthfully, I should have called it done 3 hours ago!

by Pam Tremble | Feb 21, 2010 | Art & Creativity
I take pictures of food. Often. And it’s not just a snapshot when I do it… it might take 15 or 20 shots using various camera settings and lighting angles to be satisfied with the photo shoot before I can actually begin eating the food I just took pictures of. I did it this morning. Twice.
I’ve never really thought about it as a creative outlet though. But this morning I realized that my silly food photos help me work my creative brain and makes me happy to see the results. (Which is why I’m writing about it here, of course.) And I know ya’ll are dying to ask why I take pictures of food, right? Glad you asked. LOL! As you know I have another blog (Journey to a Healthier Me) about weight loss and healthy living. That blog often includes recipes and recipes are much more fun with pictures, right? Plus it’s fun to show off food porn on the message boards too.
So here’s a sampling of this morning’s photo shoot.
Low Carb Banana Nut Muffins (from the same recipe, just baked in muffin pan instead)

And a couple from the past — turkey sandwich with a side of fresh strawberries and below, an experiment in making fermented cabbage.


by Pam Tremble | Feb 17, 2010 | Art & Creativity
This past fall the monthly assignment from my photography club was “panning.” Except I didn’t know how to do that. It’s where you stand in one place while the subject of the photo is moving and you follow the subject with your camera while smoothly panning to capture the action. This results in a blurred background and an in-focus subject. I’ll spare you the details, but let’s just say over the course of a few weeks I took over 1,000 shots that were all crap. Then finally on the day of the club meeting I got this shot after finally figuring out the right settings and technique. And now I can hit a panning shot every time I try. It’s fun to learn stuff like that!
Here are some other photos from the same shoot.
Want to learn how to do this too? Check out the tutorial at DPS – Digital Photography School.

In other news… remember the Mini Doodle Book I made and posted about last week…. I finally finished that project. Even though it was about “zendoodling” the process wasn’t very zen-like. I was on a deadline to have the project turned in as a class sample. Now I can get back to real zendoodling in my Moleskine.
I also made a similar mini book… but it was mini-er. I designed the pages to be a place for me to track my food intake, exercise, calories burned, etc. Then printed the pages doublesided and assembled a little Log Book with cute patterned cardstock covers. I’ll take pictures and show you (I know you’re dying to see it!).

by Pam Tremble | Feb 7, 2010 | Art & Creativity
As some of you know I’m back in college to finish my graphic design degree. This semester I’m taking Art History and this week we had a field trip to the Detroit Institute of Art (DIA). Our assignment was to find one piece of artwork that spoke to us and write a paper about it. After touring the gallery entitled “Tour of Italy” I thought I’d picked my artwork. (I love Italy and want to visit one day, so a painting of Rome and Tiber River seemed perfect for me.)
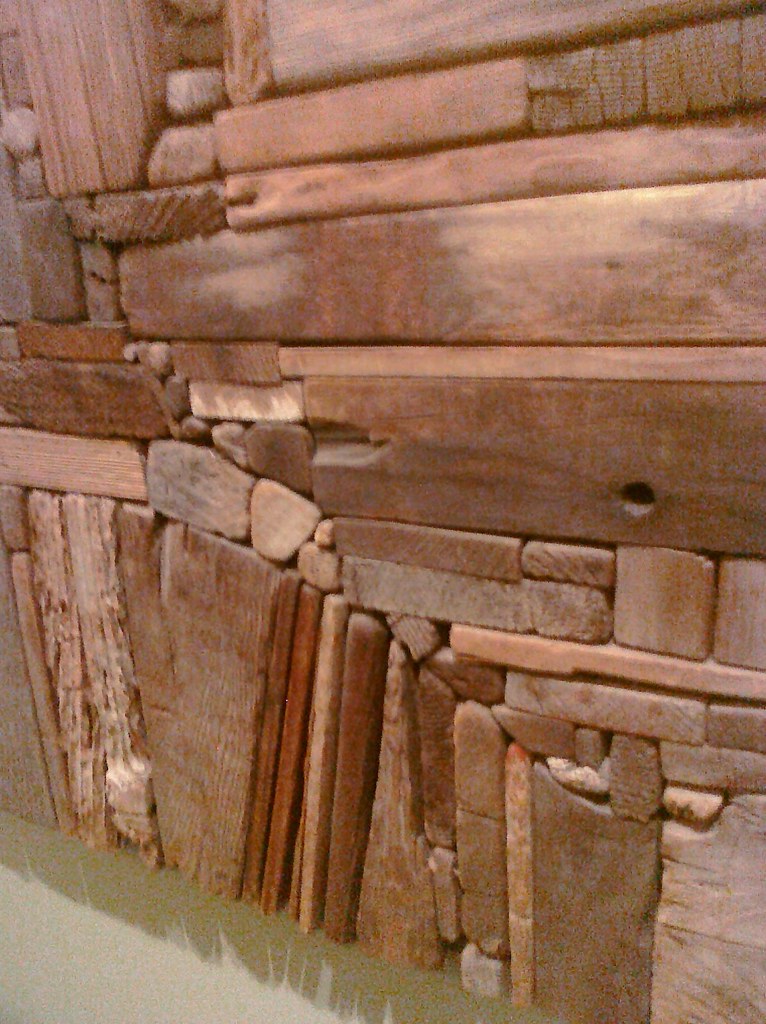
But then I came across the New England Landscape by George Morrison in the Native American Galleries. (Wood 1965-67)

Notice the way he seemed to carve around the natural knot in a piece of wood to create a new shape. I don’t know for sure if that’s what he did or if that’s how the piece came to him. But see that piece in the lower left corner – there were several of those types of pieces in the artwork.
This wood collage assemblage took my breath away and I couldn’t tear my eyes away from it. I wanted to see it close up and far away. I wanted to run my fingers across the texture of the wood (I didn’t though). I wanted to take it down off the wall and see how it was constructed on the back. I stood there in the hallway for a long while. Getting close. Then backing up and standing far away. Looking at it from an angle or straight on.
(Warning: the following pictures are horrible – but it’ll give you an idea of how majestic this piece is.)

What strikes me so much is the way the individual wood pieces are fashioned together. This pieces is dated 1965-67, so we know it took him a couple years to assemble it. But it almost looks like Morrison picked up scrap pieces of lumber off his shop floor and started nailing them together, jigsaw puzzle fashion. Each piece fits so perfectly against the next piece like they were born that way and Morrison reunited the pieces in his collage.

A view of the side/back reveals that the collages were build upon scrap lumber – obviously used since you can see paint splatters on the base wood.
I came home last night and searched for information about George Morrison. He’s one of very few Native American artists who is recognized as an American Modern Artist – without the Native distinction. He even says about himself: “I’m an artist who is Indian.” He is known for his painting, sculpture and wood collages. There are many in the series of assemblages like this one at the DIA – they are scattered all over the country including Minneapolis and Washington DC. The first photo above appeared on the DIA’s annual financial report for 2007 and it is one of the very few photos I’ve been able to find of it online (there are photos of other wood collages he made, but the one titled “New England Landscape” seems to be elusive).
I was especially drawn to the Native American Galleries because of my own Native heritage. My grandmother tells us that our family is from the Blackfoot Nation, but we have no documentation to trace our ancestry. But still, I’m often drawn to anything having to do with Native Americans.
The wood pieces he used were collected from all over the country… and the world. He would bring boxes of wood home with him from trips and people from all over the world would send him pieces of interesting-shaped wood. He used driftwood and lumber and reclaimed pieces from barns and homes along with pieces from broom handles or other hand tools. He made dozens of these wood collages, although I haven’t yet found an exhaustive list of just how many he’s done, but imagine how much wood was required to do all these. I’m still searching for information about him and have several webpages bookmarked to read. He’s got a book about his life that I want to try and find too – I’ve read small excerpts from the book on Google Books (which is where I read about his wood collecting adventures).

Unfortunately I did not take my camera with me to the DIA yesterday. I wish I had. After reading the photography policy on their website, it appeared I wouldn’t be allowed to bring my SLR camera in with me, so I just left it at home. But once I arrived I realized there were many, many people wandering around with their SLR digital cameras and the photography policy was not strictly enforced except in select areas of the museum (mainly where artwork was on paper or fabric). So the poor photos you see here were taken with my camera phone in a semi-darken hallway.
So even though this was a school field trip, it is something that fed my creative soul this week. I saw very little of the DIA in my 2 hour trip there and know I need to go back to spend an entire day. The photography gallery wasn’t open and I’d love to see what they have in there. And I didn’t even get to the contemporary galleries with more modern works of art. I’d also like to spend more time studying the big name guys — Monet, Van Gogh, Picasso, etc. And of course, I want to go back and see this George Morrison piece again.
~Pam


You must be logged in to post a comment.